In this guide, you will learn, how to install Drupal on CentOS 7 or other Redhat based Linux distros. #centlinux #linux #drupal
Table of Contents
What is Drupal? :
Drupal is free and open source content management framework. Drupal is written in PHP using Symfony framework. It is developed and supported by Drupal community. Drupal is distributed under GPLv2 license. Currently, its stable version Drupal 8.7 is available for use.
In this article, we will install Drupal on CentOS 7 LEMP server. At first, we will configure a LEMP (Linux, Nginx, MySQL, PHP) server and then deploy Drupal 8 on it.
This article focuses on the installation and configuration of Drupal 8 on CentOS 7 based LEMP server. However, you can read Drupal 8 Explained: Your Step-by-Step Guide to Drupal 8 (PAID LINK) by Stephen Burge and Cindy McCourt to build a strong understanding of Drupal 8 software and its usage.
Drupal 8 Features:
Additional features can be added to Drupal 8 by means of Drupal modules. However, Drupal 8 core software provides following features.
- Access statistics and logging
- Caching and feature throttling for improved performance
- Multi-level menu system
- Multi-user content creation and editing
- RSS feed and feed aggregator
- Descriptive URLs
Drupal 8 System Requirements:
We are installing Drupal 8 on CentOS 7 LEMP server by considering following requirements.
- Database Server – MariaDB 5.5.2 or later (with PDO extension)
- Web Server – Nginx 0.7.x or later
- PHP Support – PHP 7.2 or later (with OPCache)
For a complete list of supported software and system requirements please see Drupal 8 Documentation.
Environment Specification:
We have provisioned a CentOS 7 virtual machine with following specification.
- CPU – 3.4 Ghz (2 cores)
- Memory – 2 GB
- Storage – 20 GB
- Operating System – CentOS 7.6
- Hostname – drupal-8-server.example.com
- IP Address – 192.168.116.182/24
Install MariaDB Server on CentOS 7:
Drupal 8 requires MariaDB 5.5.2 or later.
Luckily, MariaDB 5.5.6 is available in standard yum repositories of CentOS 7.6 server. Therefore, we can install it easily using yum command.
# yum install -y mariadb-server
Enable and start MariaDB service.
# systemctl enable mariadb
Created symlink from /etc/systemd/system/multi-user.target.wants/mariadb.service to /usr/lib/systemd/system/mariadb.service.
# systemctl start mariadb
Configure and secure MariaDB database server as follows.
# mysql_secure_installation

NOTE: RUNNING ALL PARTS OF THIS SCRIPT IS RECOMMENDED FOR ALL MariaDB
      SERVERS IN PRODUCTION USE!  PLEASE READ EACH STEP CAREFULLY!

In order to log into MariaDB to secure it, we'll need the current
password for the root user.  If you've just installed MariaDB, and
you haven't set the root password yet, the password will be blank,
so you should just press enter here.

Enter current password for root (enter for none):
OK, successfully used password, moving on...

Setting the root password ensures that nobody can log into the MariaDB
root user without the proper authorisation.

Set root password? [Y/n] Y
New password:
Re-enter new password:
Password updated successfully!
Reloading privilege tables..
 ... Success!


By default, a MariaDB installation has an anonymous user, allowing anyone
to log into MariaDB without having to have a user account created for
them.  This is intended only for testing, and to make the installation
go a bit smoother.  You should remove them before moving into a
production environment.

Remove anonymous users? [Y/n] Y
 ... Success!

Normally, root should only be allowed to connect from 'localhost'.  This
ensures that someone cannot guess at the root password from the network.

Disallow root login remotely? [Y/n] Y
 ... Success!

By default, MariaDB comes with a database named 'test' that anyone can
access.  This is also intended only for testing, and should be removed
before moving into a production environment.

Remove test database and access to it? [Y/n] Y
 - Dropping test database...
 ... Success!
 - Removing privileges on test database...
 ... Success!

Reloading the privilege tables will ensure that all changes made so far
will take effect immediately.

Reload privilege tables now? [Y/n] Y
 ... Success!

Cleaning up...

All done!  If you've completed all of the above steps, your MariaDB
installation should now be secure.

Thanks for using MariaDB!
Connect with MariaDB database instance.
# mysql -u root -p123
Welcome to the MariaDB monitor.  Commands end with ; or g.
Your MariaDB connection id is 2
Server version: 5.5.60-MariaDB MariaDB Server

Copyright (c) 2000, 2018, Oracle, MariaDB Corporation Ab and others.

Type 'help;' or 'h' for help. Type 'c' to clear the current input statement.

MariaDB [(none)]>
Create a database and a user for Drupal 8 software.
MariaDB [(none)]> CREATE DATABASE drupal CHARACTER SET utf8mb4 COLLATE utf8mb4_general_ci;
Query OK, 1 row affected (0.03 sec)

MariaDB [(none)]> GRANT ALL ON drupal.* TO 'drupaluser'@'localhost' IDENTIFIED BY '123';
Query OK, 0 rows affected (0.01 sec)
Reload privileges tables and exit.
MariaDB [(none)]> flush privileges;
Query OK, 0 rows affected (0.01 sec)

MariaDB [(none)]> exit
Bye
MariaDB server has been installed on CentOS 7. However, You can also install a latest version of MariaDB.
Install Nginx Server on CentOS 7:
Nginx 1.12.2 web server is available in EPEL (Extra Packages for Enterprise Linux) yum repository.
Therefore, first we have to install EPEL yum repository and then we will install Nginx from EPEL.
# yum install -y epel-releaseBuild cache for EPEL yum repository.
# yum makecache fast
Loaded plugins: fastestmirror
Loading mirror speeds from cached hostfile
epel/x86_64/metalink                                     | 6.6 kB     00:00
 * base: mirrors.ges.net.pk
 * epel: mirror2.totbb.net
 * extras: mirrors.ges.net.pk
 * updates: mirrors.ges.net.pk
base                                                     | 3.6 kB     00:00
epel                                                     | 5.3 kB     00:00
extras                                                   | 3.4 kB     00:00
updates                                                  | 3.4 kB     00:00
(1/3): epel/x86_64/group_gz                                |  88 kB   00:04
(2/3): epel/x86_64/primary_db                              | 6.8 MB   00:17
(3/3): epel/x86_64/updateinfo                              | 977 kB   00:36
Metadata Cache Created
Now, we can install Nginx using yum command.
# yum install -y nginxEnable and start Nginx service.
# systemctl enable nginx
Created symlink from /etc/systemd/system/multi-user.target.wants/nginx.service to /usr/lib/systemd/system/nginx.service.
# systemctl start nginx
Allow HTTP service in Linux firewall.
# firewall-cmd --permanent --add-service=http
success
# firewall-cmd --reload
success
Nginx web server has been installed on Linux server.
Install PHP on CentOS 7:
Drupal 8 requires PHP 7.2 or later, which is not available in standard yum repositories.
Therefore, first we have to install Remi, a third party yum repository, on our CentOS 7 server, then we will install PHP 7.2 from Remi repository.
# rpm -ivh http://rpms.remirepo.net/enterprise/remi-release-7.rpm
Retrieving http://rpms.remirepo.net/enterprise/remi-release-7.rpm
warning: /var/tmp/rpm-tmp.jWkqrj: Header V4 DSA/SHA1 Signature, key ID 00f97f56: NOKEY
Preparing...                          ################################# [100%]
Updating / installing...
   1:remi-release-7.6-2.el7.remi      ################################# [100%]
Build cache for Remi yum repository.
# yum makecache fastNow, we can install a latest version PHP using yum command.
# yum install php72-php php72-php-mysqlnd php72-php-fpm php72-php-gd php72-php-xml php72-php-mbstring php72-php-pdo php72-php-opcache -yConfigure php-fpm for Nginx server.
# vi /etc/opt/remi/php72/php-fpm.d/www.confFind and set following parameters therein.
user = nginx
group = nginx
listen = /run/php-fpm/www.sock
listen.owner = nginx
listen.group = nginx
Create directory for Unix socket and change owner to nginx user.
# mkdir /run/php-fpm
# chown nginx /run/php-fpm
Enable and start php-fpm service.
# systemctl enable php72-php-fpm
Created symlink from /etc/systemd/system/multi-user.target.wants/php72-php-fpm.service to /usr/lib/systemd/system/php72-php-fpm.service.
# systemctl start php72-php-fpm
PHP 7.2 has been installed on our Linux server.
Install Drupal on CentOS 7:
Download the latest version from Drupal Download Page.
# cd /tmp
# wget -O drupal.tar.gz https://www.drupal.org/download-latest/tar.gz
--2019-06-29 09:51:53--  https://ftp.drupal.org/files/projects/drupal-8.7.3.tar.gz
Resolving ftp.drupal.org (ftp.drupal.org)... 151.101.10.217
Connecting to ftp.drupal.org (ftp.drupal.org)|151.101.10.217|:443... connected.
HTTP request sent, awaiting response... 200 OK
Length: 17825116 (17M) [application/octet-stream]
Saving to: âdrupal.tar.gzâ

100%[======================================>] 17,825,116  1.23MB/s   in 16s

2019-06-29 09:52:11 (1.10 MB/s) - âdrupal.tar.gzâ saved [17825116/17825116]
Extract downloaded file to /var/www/ directory to install Drupal on CentOS 7.
# tar xf drupal.tar.gz -C /var/www/Rename the Drupal software directory as follows.
# cd
# mv /var/www/drupal-8.7.3/ /var/www/drupal8
Create following directory as required by Drupal 8 installer.
# mkdir /var/www/drupal8/sites/default/filesChange owner of Drupal 8 software to nginx user.
# chown -R nginx:nginx /var/www/drupal8/
# restorecon -R /var/www/drupal8/
Create Nginx website configuration for Drupal 8.
# vi /etc/nginx/conf.d/drupal.confDrupal 8 website provides a predefined Nginx+Drupal recipe. We are using it here to configure our Drupal server.
Note: Customizations are highlighted with yellow color.
server {
    server_name drupal-8-server.example.com example.com;
    root /var/www/drupal8; ## <-- Your only path reference.

    location = /favicon.ico {
        log_not_found off;
        access_log off;
    }

    location = /robots.txt {
        allow all;
        log_not_found off;
        access_log off;
    }

    # Very rarely should these ever be accessed outside of your lan
    location ~* .(txt|log)$ {
        allow 192.168.116.0/24;
        deny all;
    }

    location ~ ..*/.*.php$ {
        return 403;
    }

    location ~ ^/sites/.*/private/ {
        return 403;
    }

    # Block access to scripts in site files directory
    location ~ ^/sites/[^/]+/files/.*.php$ {
        deny all;
    }

    # Allow "Well-Known URIs" as per RFC 5785
    location ~* ^/.well-known/ {
        allow all;
    }

    # Block access to "hidden" files and directories whose names begin with a
    # period. This includes directories used by version control systems such
    # as Subversion or Git to store control files.
    location ~ (^|/). {
        return 403;
    }

    location / {
        # try_files $uri @rewrite; # For Drupal <= 6
        try_files $uri /index.php?$query_string; # For Drupal >= 7
    }

    location @rewrite {
        rewrite ^/(.*)$ /index.php?q=$1;
    }

    # Don't allow direct access to PHP files in the vendor directory.
    location ~ /vendor/.*.php$ {
        deny all;
        return 404;
    }

    # In Drupal 8, we must also match new paths where the '.php' appears in
    # the middle, such as update.php/selection. The rule we use is strict,
    # and only allows this pattern with the update.php front controller.
    # This allows legacy path aliases in the form of
    # blog/index.php/legacy-path to continue to route to Drupal nodes. If
    # you do not have any paths like that, then you might prefer to use a
    # laxer rule, such as:
    #   location ~ .php(/|$) {
    # The laxer rule will continue to work if Drupal uses this new URL
    # pattern with front controllers other than update.php in a future
    # release.
    location ~ '.php$|^/update.php' {
        fastcgi_split_path_info ^(.+?.php)(|/.*)$;
        # Security note: If you're running a version of PHP older than the
        # latest 5.3, you should have "cgi.fix_pathinfo = 0;" in php.ini.
        # See http://serverfault.com/q/627903/94922 for details.
        include fastcgi_params;
        # Block httpoxy attacks. See https://httpoxy.org/.
        fastcgi_param HTTP_PROXY "";
        fastcgi_param SCRIPT_FILENAME $document_root$fastcgi_script_name;
        fastcgi_param PATH_INFO $fastcgi_path_info;
        fastcgi_param QUERY_STRING $query_string;
        fastcgi_intercept_errors on;
        # PHP 5 socket location.
        #fastcgi_pass unix:/var/run/php5-fpm.sock;
        # PHP 7 socket location.
        fastcgi_pass unix:/run/php-fpm/www.sock;
    }

    # Fighting with Styles? This little gem is amazing.
    # location ~ ^/sites/.*/files/imagecache/ { # For Drupal <= 6
    location ~ ^/sites/.*/files/styles/ { # For Drupal >= 7
        try_files $uri @rewrite;
    }

    # Handle private files through Drupal. Private file's path can come
    # with a language prefix.
    location ~ ^(/[a-z-]+)?/system/files/ { # For Drupal >= 7
        try_files $uri /index.php?$query_string;
    }

    location ~* .(js|css|png|jpg|jpeg|gif|ico|svg)$ {
        try_files $uri @rewrite;
        expires max;
        log_not_found off;
    }
}
Restart Nginx service.
# systemctl restart nginxTemporarily put SELinux in permissive mode, so the Drupal 8 installer can create necessary files in Drupal software directory.
# setenforce 0Open URL http://drupal-8-server.example.com using a web browser.
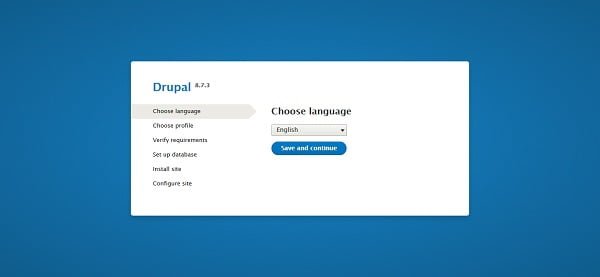
Select your preferred language and click on Save and Continue.
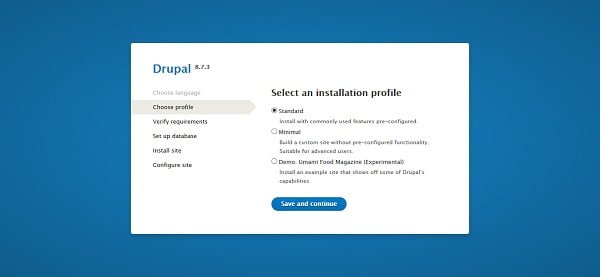
Select an installation profile and click on Save and Continue.
We have selected Standard Profile.
If there is any missing requirement then it will show you the Verify Requirements page, otherwise it will take you to the Set up Database page.
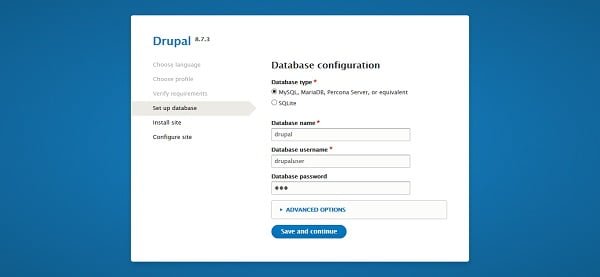
Provide the database and user names that we have created above.
Click on Save and Continue.
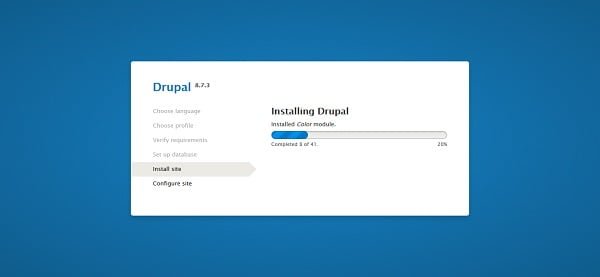
Drupal 8 installation is in progress now.
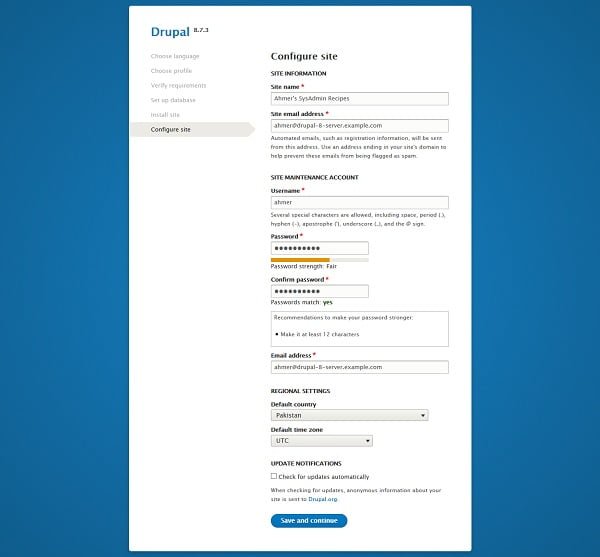
Configure your website according to your requirements.
Click on Save and Continue.
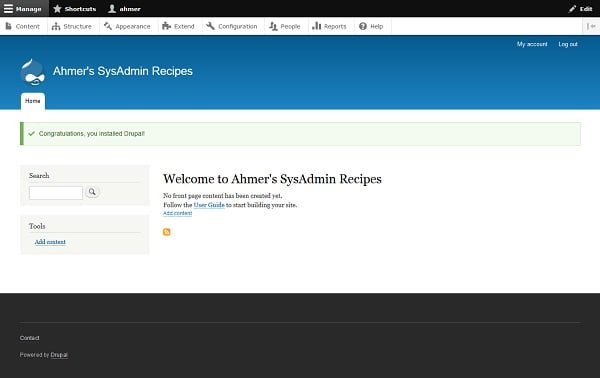
We have reached at the dashboard of ahmer user.
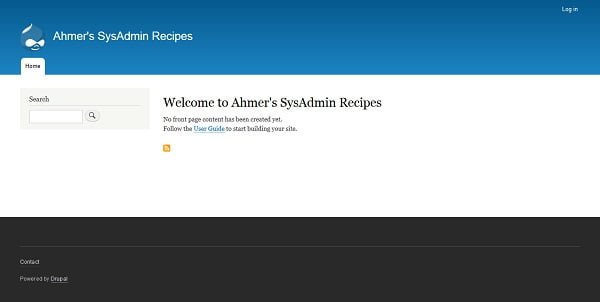
We can also visit our Drupal 8 website using the URL http://drupal-8-server.example.com.
Put SELinux in enforcing mode to increase security.
# setenforce 1We have successfully install Drupal on CentOS 7 LEMP server.
Conclusion – Install Drupal on CentOS 7 :
In this guide, you have learned, how to install Drupal on CentOS 7 or other Redhat based Linux distros.

