In this article, you will learn how to perform Debian 10 minimal installation with screenshots and step by step guide. #centlinux #linux #debian
Table of Contents
What is Debian?
Debian also known as Debian GNU/Linux is a Linux distribution composed of free and open source software, developed by community supported Debian project, which was established by Ian Murdock on August 16, 1993. Debian is one of the oldest distribution based on Linux Kernel. (Courtesy: Wikipedia)
Ubuntu is the most famous Linux distribution now-a-days, is also derived from Debian Project.
If you are looking for installation of other Linux distros, then you may look at following articles.
- How to install Ubuntu 18.04 LTS Server (with screenshots)
- Minimal Installation of CentOS 8 (with screenshots)
- Minimal Installation of Rocky Linux 8 (with screenshots)
- AlmaLinux 8 Minimal Installation (with screenshots)
To learn about the in depth architecture of Linux operating system and working of background processes, you should read How Linux Works, 2nd Edition: What Every Superuser Should Know (PAID LINK) by Brian Ward.
Environment Specification:
We have provisioned a KVM virtual machine with following specification.
- CPU – 3.4 Ghz (2 cores)
- Memory – 2 GB
- Storage – 20 GB
Debian 10 Minimal Installation:
Debian is free and open source software, therefore it is available for download from Debian Project website.
After downloading the Debian ISO, attach it in DVDROM of your server and turn on the virtual machine.

On boot from Debian ISO, a boot menu will be displayed with different options.
Since, we are going to install Debian server in Graphical mode, therefore select “Graphical install” option and press <ENTER>.

Installer is now asking for the language being used during the installation process. The same language will be used as the default language for the installed Debian server.
Select your preferred language and click on Continue.

Installer is now asking for a location, that will be used to set the regional settings of your Linux operating system.
Select your geographical location and press Continue.

This time you need to provide the Keyboard layout.
Choose the preferred keyboard and click Continue.

Installer is now loading installation components from Debian ISO/CD.

After loading installation components, the Linux installer displays the network configuration screen.
Provide the desired hostname for your Debian server and click on Continue.

To setup a FQDN (Fully Qualified Domain Name), you are also required to provide a domain name.
Provide your domain name here and press Continue.

You are now at the “Setup users and passwords” screen.
Set a strong password for the root superuser and click Continue.

Debian installer is now asking to create an administrative user that will be used as an alternative of the default root user due to the security measures.
Provide the full name of your desired user account and click on Continue.

Now provide the username for this administrative user account and click Continue.

Finally set a strong password for this administrative user account and click on Continue.

Choose your desired time zone and press Continue.

Installer is now asking to setup the partitions for installing the Debian operating system.
There are two types of configuration options available here.
- “Guided” options are used for automatic configurations based on some predefined templates.
- “Manual” option is used to configure each partition settings i.e. type, size, etc.
Select the “Guided – use entire disk” option and click on Continue.

Choose a disk on which you want to create the required partitions and click on Continue.

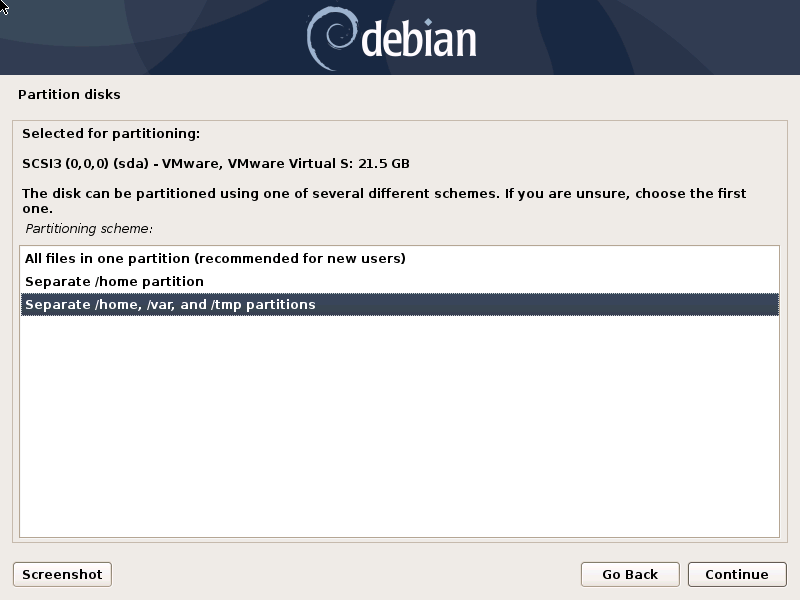
Choose your preferred partitioning scheme and click Continue.
For better space management and security, we recommend that you should select “Separate /home, /var, and /tmp partitions” option.

Based on the selection, Installer creates a partition layout and asking for any further customization in the partition layout.
Select “Finish partioning and write changes to disk” and click Continue.

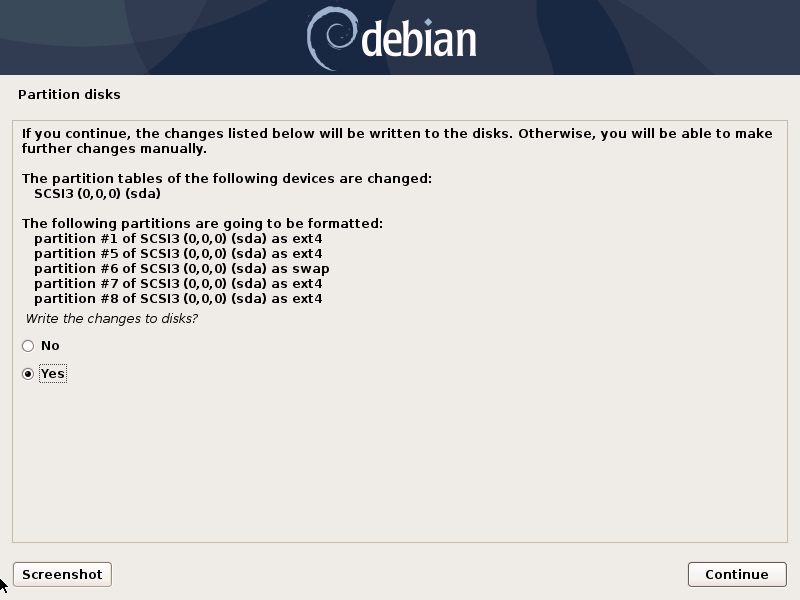
Installer is asking for the confirmation to write changes to disk.
Select “Yes” option and click on Continue.

Debian Server is now installing its base system.

Installer is now configuring network mirrors for downloading and installing Debian software packages.
Select “Yes” option and click on Continue.

Choose the location nearest to your geographical existence to help the Installer in setting up the closest network mirror for your Linux server.
Click on Continue.

Select a mirror archive from the list provided by the Debian installer and click on Continue.

If your Linux machine uses a proxy server to access the Internet then provide its address and port here. Otherwise leave the field blank and click on Continue.

Installer is configuring apt package manager now.

Choose the “No” option and click on Continue.

Select the software options that you would like to install.
Since, You are installing a minimal Debian environment therefore, you should only selecting “SSH Server” and “standard system utilities”.
Click on Continue.

Setup is now performing debian minimal installation.

Installer is asking to install GRUB (Grand Unified Bootloader) on the MBR (Master Boot Record) of the disk in use.
Select “Yes” option and click on Continue.

Select the disk to install GRUB and click on Continue.

Setup process is installing GRUB now.

Debian minimal installation has been completed successfully.
Click on Continue to restart the system.

After restart, you are now at the GRUB Boot Menu.
Select the option “Debian GNU/Linux” and press <ENTER>.

Finally you are at the CLI (Command Line Interface) login prompt of Debian Server.

Login as the administrative user that you have created during Debian minimal installation.
Conclusion – Debian 10 Minimal Installation:
In this article, you have learned about Debian 10 Minimal Installation with screenshots.


