Learn how to install Redmine on RHEL 8 with this step-by-step guide. Follow our detailed instructions to set up Redmine, a powerful project management tool, on your Red Hat Enterprise Linux 8 server. #centlinux #linux #redmine
Table of Contents
What is Redmine?
Redmine is an open-source project management and issue tracking tool. It is web-based and provides a flexible and feature-rich environment for managing projects. (Redmine Official Website)
Key features of Redmine include:
- Project Management: Support for multiple projects, each with its own set of features.
- Issue Tracking: Comprehensive issue tracking capabilities to manage bugs, tasks, and features.
- Gantt Charts and Calendars: Visual tools to track project timelines and schedules.
- Time Tracking: Allows users to log time spent on various tasks and projects.
- Customizable Workflows: Adaptable workflows to suit different project needs and processes.
- User Roles and Permissions: Granular control over user access and permissions.
- News, Documents, and Files Management: A central place to store and share project-related information.
- Wikis and Forums: Collaborative tools to enhance team communication and documentation.
- Integrations: Supports integration with various version control systems (e.g., Git, SVN) and other tools.
Redmine is written using the Ruby on Rails framework. It is cross-platform and cross-database and supports 49 languages.
Redmine is highly customizable and extensible, allowing users to tailor it to their specific needs through plugins and themes. Its versatility makes it suitable for a wide range of industries and project types.
Redmine vs Jira
Redmine and Jira are both powerful project management and issue tracking tools, but they have distinct differences in terms of features, usability, pricing, and target audience. Here’s a detailed comparison:
Features
Redmine:
- Open-source: Free to use and modify.
- Multiple Projects: Supports multiple projects with a wide range of features.
- Issue Tracking: Comprehensive issue tracking with customizable fields and workflows.
- Gantt Charts and Calendars: Built-in tools for visualizing project timelines.
- Time Tracking: Allows users to log time spent on tasks.
- Customizable: Highly customizable through plugins and themes.
- Wikis and Forums: Integrated wikis and forums for collaboration.
- Integration: Supports integration with various version control systems like Git, SVN.
Jira:
- Commercial Software: Paid plans with a free tier for small teams.
- Agile Project Management: Strong support for Scrum, Kanban, and other Agile methodologies.
- Issue Tracking: Advanced issue tracking with detailed reporting and customizable workflows.
- Roadmaps and Backlogs: Tools for long-term planning and backlog management.
- Automation: Powerful automation rules to streamline repetitive tasks.
- Integrations: Extensive integrations with other Atlassian products (e.g., Confluence, Bitbucket) and third-party tools.
- Market Presence: Extensive marketplace for add-ons and plugins.
Usability
Redmine:
- Interface: Basic and functional, but can feel outdated.
- Customization: Requires technical knowledge for extensive customization.
- Setup: Needs manual installation and configuration, which can be complex for non-technical users.
Jira:
- Interface: Modern, intuitive, and highly customizable.
- Ease of Use: More user-friendly, especially for non-technical users.
- Setup: Cloud-based version is easy to set up; self-hosted version available for more control.
Pricing
Redmine:
- Cost: Free and open-source.
- Hosting: Costs associated with hosting and maintaining the server.
Jira:
- Cost: Paid plans starting with a free tier for up to 10 users; pricing scales with the number of users and features.
- Cloud and Server Options: Different pricing models for cloud-based and self-hosted versions.
Target Audience
Redmine:
- Flexibility: Suitable for a wide range of industries due to its customizable nature.
- Developers and Technical Teams: Often preferred by teams with technical expertise who can manage its setup and customization.
Jira:
- Software Development Teams: Highly popular among Agile and DevOps teams.
- Large Enterprises: Scalable solution suitable for large organizations with complex project management needs.
Community and Support
Redmine:
- Community Support: Active community with forums and documentation.
- Professional Support: Available through third-party providers.
Jira:
- Professional Support: Comprehensive support from Atlassian, including documentation, community forums, and customer support.
- Training and Resources: Extensive training materials and certifications available.
Conclusion
- Choose Redmine if you need a free, open-source solution and have the technical expertise to customize and maintain it.
- Choose Jira if you are looking for a robust, user-friendly tool with extensive features and support, especially if your team follows Agile methodologies.
The best choice depends on your specific requirements, budget, and technical capabilities.
Environment Specification
We are using a minimal Red Hat Enterprise Linux 8 virtual machine with following specifications.
- CPU – 3.4 Ghz (2 cores)
- Memory – 2 GB
- Storage – 20 GB
- Operating System – RHEL 8.4
- Hostname – redmine-01.centlinux.com
- IP Address – 192.168.116.238/24
For testing and experimenting with Redmine on RHEL 8, a dedicated environment is essential. Many Linux enthusiasts and administrators prefer using a Mini PC or a reliable VPS service like Hostinger to create a flexible home lab setup. A Mini PC offers a cost-effective, energy-efficient solution for running multiple Linux servers locally.
[Grab a Mini PC for your Home Lab – Shop with Us!]
While a Hostinger VPS provides scalable resources with excellent uptime and remote accessibility.
[Get Reliable VPS Hosting at Affordable Prices – Sign Up Now!]
Both options allow you to safely test Redmine installations and configurations without impacting production systems. If you’re interested, I recommend checking out the Mini PCs and Hostinger VPS plans linked above to get started with your own Linux home lab.
Disclaimer: Some of the links in this post are affiliate links. This means I may earn a small commission at no extra cost to you if you make a purchase through these links. Your support helps me create more helpful Linux tutorials.
Update your Linux Server
By using a ssh client, connect with Linux server as root user.
By following the best practice, update software packages in your Linux operating system before installing Redmine project management tool.
dnf update -yIf the above command updates your Linux Kernel then you should restart your operating system with the newly installed kernel.
rebootCheck the Linux Kernel version on your machine.
uname -rOutput:
4.18.0-305.12.1.el8_4.x86_64
Check the version of your Linux operating system.
cat /etc/redhat-releaseOutput:
Red Hat Enterprise Linux release 8.4 (Ootpa)
Create Linux User for Redmine
Here, we are installing Redmine project management software in /opt/redmineuser.
Therefore, create a Linux user and set /opt/redmineuser as its home directory.
useradd -r -m -d /opt/redmineuser redmineuserSet the password for redmineuser.
passwd redmineuserGrant sudo privilege to redmineuser, required for executing bundle commands.
usermod -aG wheel redmineuserInstall Apache on RHEL 8
Redmine software requires a web server to deploy it’s application. Therefore, execute dnf command and install Apache on your Linux server.
dnf install -y httpdEnable and start Apache web server.
systemctl enable --now httpd.serviceGrant redmineuser group to apache user, so it have necessary access to the files in /opt/redmineuser directory.
usermod -aG redmineuser apacheInstall MySQL on RHEL 8
Redmine software currently supports PostgreSQL and MySQL databases. Here, we are using a MariaDB database server and configure it as the backend for the Project management application.
You can follow our previous post to install MariaDB database on CentOS 8.
Connect with MySQL database instance as root user.
mysql -u root -pExecute following commands at MySQL shell to create a database and user for Redmine software.
create database redminedb;
grant all on redminedb.* to redmineadmin@localhost identified by 'P@ssw0rd';
flush privileges;
quit
Read Also: MySQL Cheat Sheet: DBA Edition 2025
Installing EPEL Yum Repository
Some of the prerequisite packages of Redmine software are not available in standard yum repositories, therefore, you need to install EPEL yum repository on your Linux server.
The procedure of installing EPEL is little bit different on CentOS and RHEL operating systems.
Execute the following commands to install EPEL on CentOS 8 and enable the required repo.
dnf install -y epel-release
dnf config-manager --set-enabled PowerTools
Execute the following commands to install EPEL on RHEL 8 and enable the required repo.
dnf install -y https://dl.fedoraproject.org/pub/epel/epel-release-latest-8.noarch.rpm
subscription-manager repos --enable "codeready-builder-for-rhel-8-x86_64-rpms"
Build cache for newly added yum repositories.
dnf makecacheOutput:
Updating Subscription Management repositories.
Extra Packages for Enterprise Linux Modular 8 - 6.6 kB/s | 9.4 kB     00:01
Extra Packages for Enterprise Linux 8 - x86_64  5.2 kB/s | 5.7 kB     00:01
Red Hat Enterprise Linux 8 for x86_64 - BaseOS  2.6 kB/s | 4.1 kB     00:01
Red Hat CodeReady Linux Builder for RHEL 8 x86_ 201 kB/s | 5.4 MB     00:27
Red Hat Enterprise Linux 8 for x86_64 - AppStre 3.5 kB/s | 4.5 kB     00:01
Metadata cache created.
Install Redmine Software Prerequisites
If you have setup the yum repositories as per above steps then you can easily install all the prerequisites with a single dnf command.
dnf install -y ruby ruby-devel rpm-build wget libxml2-devel make automake libtool ImageMagick ImageMagick-devel mariadb-devel httpd-devel openssl-devel libcurl-devel gcc gcc-c++Check the version of your installed ruby.
ruby -vOutput:
ruby 2.5.9p229 (2021-04-05 revision 67939) [x86_64-linux]
Read Also: Install ImageMagick Software on Rocky Linux 9
Configure Linux Firewall
Redmine is written in Ruby programming language. And the default port for Ruby web server is 3000/tcp.
Therefore, you need to add this port in Linux firewall, to make your application accessible across the network.
firewall-cmd --add-port=3000/tcp --permanent
firewall-cmd --reload
Install Redmine on RHEL 8
Switch to redmineuser to start installation of your project management software.
su - redmineuserGo to Redmine Download Page and copy the URL of latest stable release of Redmine software.
Then use wget command to download Redmine setup.
wget https://www.redmine.org/releases/redmine-4.2.2.tar.gzExtract downloaded zip file to /opt/redmineuser directory by using following command.
tar xzf redmine-4.2.2.tar.gz -C /opt/redmineuser/ --strip-components=1Create Redmine configuration files by using the vendor supplied examples.
cd /opt/redmineuser/
cp config/configuration.yml.example config/configuration.yml
cp config/database.yml.example config/database.yml
cp public/dispatch.fcgi.example public/dispatch.fcgi
Redmine uses YAML files to store configurations, therefore, you can easily edit these settings by using a text editor.
Edit database.yml file in vim text editor.
vi config/database.ymlFind and configure your database connection settings under following section.
production:
  adapter: mysql2
  database: redminedb
  host: localhost
  username: redmineadmin
  password: "P@ssw0rd"
  # Use "utf8" instead of "utfmb4" for MySQL prior to 5.7.7
  encoding: utf8mb4
Execute following gem command to install bundler for managing ruby gem dependencies.
gem install bundlerOutput:
Fetching: bundler-2.2.25.gem (100%)
Successfully installed bundler-2.2.25
Parsing documentation for bundler-2.2.25
Installing ri documentation for bundler-2.2.25
Done installing documentation for bundler after 7 seconds
1 gem installed
Set the environment and install gem dependencies as follows.
bundle config set --local without 'development test'
bundle install
Output:
...
Fetching roadie-rails 2.2.0
Installing rails 5.2.6
Installing roadie-rails 2.2.0
Bundle complete! 37 Gemfile dependencies, 63 gems now installed.
Gems in the groups 'development' and 'test' were not installed.
Use `bundle info [gemname]` to see where a bundled gem is installed.
If you face conflicts in gems versions then you can execute following command to restore gems to pristine state.
sudo gem pristine --allTo prevent tampering of the cookies that stores session data, you are required to generate a random secret key.
bundle exec rake generate_secret_tokenCreate database structure by executing following command.
RAILS_ENV=production bundle exec rake db:migrateOutput:
...
== 20190510070108 AddUniqueIdToImportItems: migrating =========================
-- change_table(:import_items)
   -> 0.0082s
== 20190510070108 AddUniqueIdToImportItems: migrated (0.0085s) ================

== 20190620135549 ChangeRolesNameLimit: migrating =============================
-- change_column(:roles, :name, :string, {:limit=>255, :default=>""})
   -> 0.0035s
== 20190620135549 ChangeRolesNameLimit: migrated (0.0037s) ====================

== 20200826153401 AddTwofaSchemeToUser: migrating =============================
-- add_column(:users, :twofa_scheme, :string)
   -> 0.0032s
== 20200826153401 AddTwofaSchemeToUser: migrated (0.0034s) ====================

== 20200826153402 AddTotpToUser: migrating ====================================
-- add_column(:users, :twofa_totp_key, :string)
   -> 0.0024s
-- add_column(:users, :twofa_totp_last_used_at, :integer)
   -> 0.0026s
== 20200826153402 AddTotpToUser: migrated (0.0052s) ===========================
Insert default configuration data into the MySQL database.
RAILS_ENV=production REDMINE_LANG=en bundle exec rake redmine:load_default_dataOutput:
Default configuration data loaded.
Create necessary directories and adjust file permissions.
mkdir -p tmp/pdf
mkdir -p public/plugin_assets
chown -R redmineuser:redmineuser files log tmp public/plugin_assets
chmod -R 755 /opt/redmineuser/
Execute the following command to start a Rails server instance by using WEBrick.
bundle exec rails server webrick -e productionOutput:
...
=> Booting WEBrick
=> Rails 5.2.6 application starting in production on http://0.0.0.0:3000
=> Run `rails server -h` for more startup options
[2021-08-14 14:57:49] INFO  WEBrick 1.4.2.1
[2021-08-14 14:57:49] INFO  ruby 2.5.9 (2021-04-05) [x86_64-linux]
[2021-08-14 14:57:49] INFO  WEBrick::HTTPServer#start: pid=3545 port=3000
Open URL http://192.168.116.238:3000/login in a web browser.
Login with default credentials i.e. admin/admin.
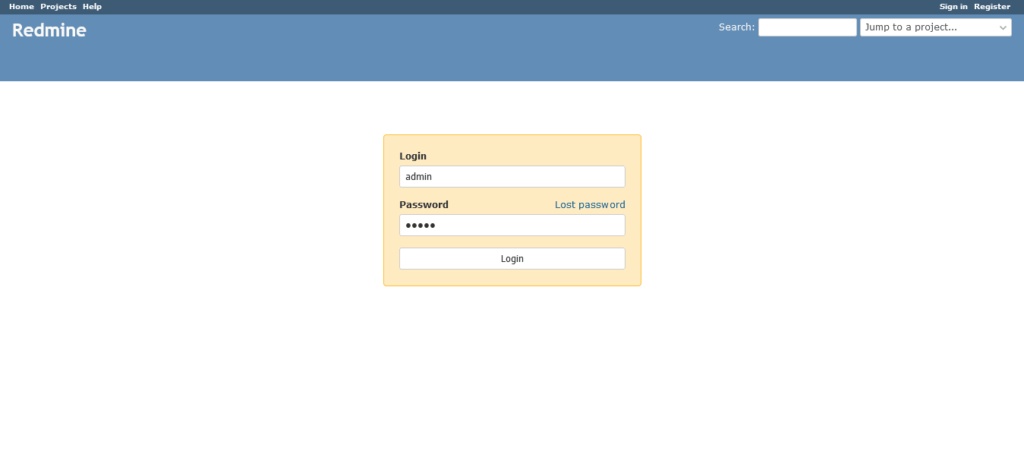
Since, you are login for the first time, therefore you may be asked to change the password.
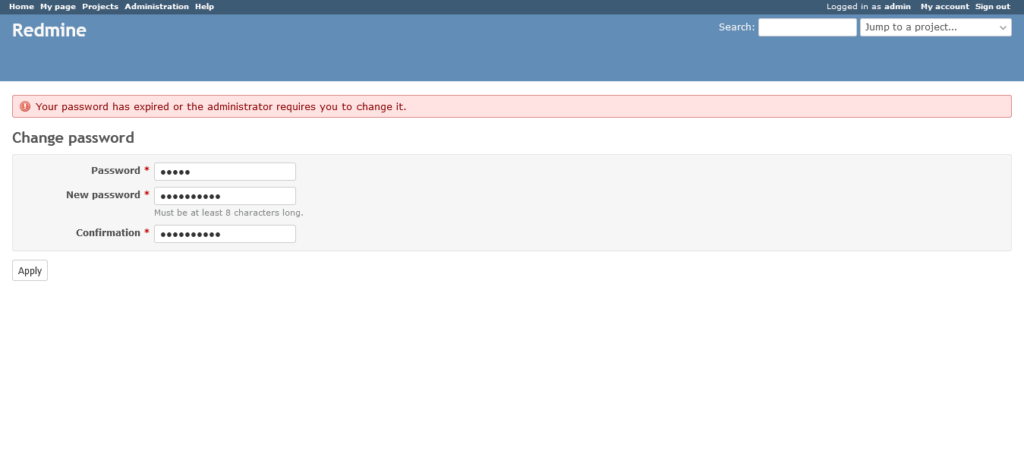
After changing your password, you will be redirected to the “My Account” page.
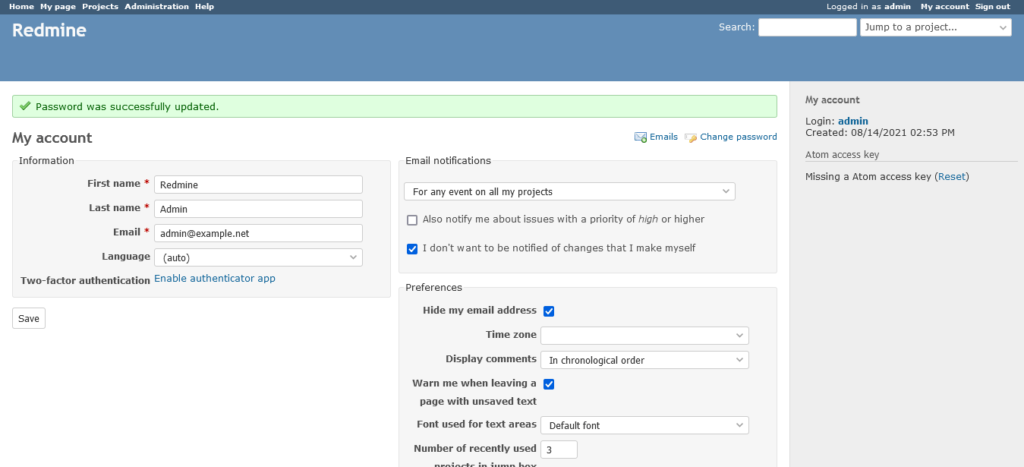
You have successfully install Redmine on Linux 8.
Install Phusion Passenger on RHEL 8
Phusion Passenger is a ruby application server that can be used to serve Redmine via Apache web server.
You can install Passenger by using following gem command.
gem install passenger --no-rdoc --no-riOutput:
Fetching: passenger-6.0.10.gem (100%)
Building native extensions. This could take a while...
Successfully installed passenger-6.0.10
1 gem installed
Install Passenger module on Apache web server.
passenger-install-apache2-moduleDuring execution of above command, you are asked to create following configuration files.
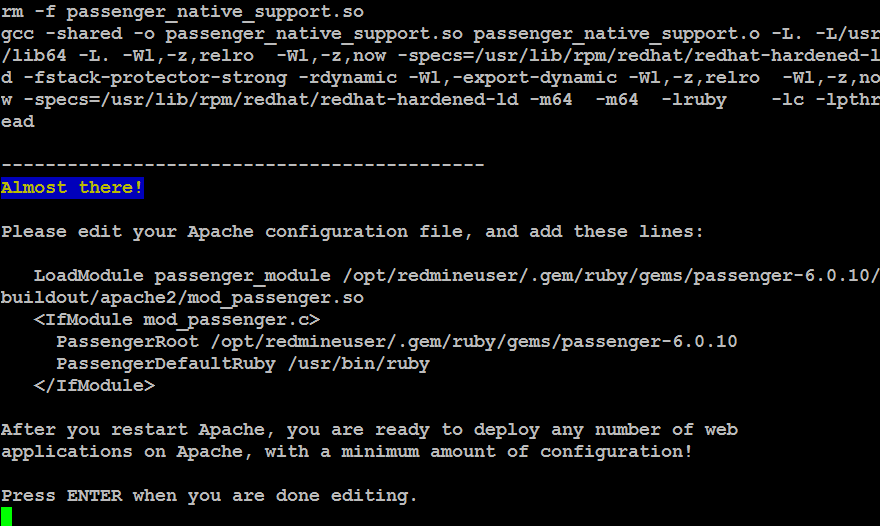
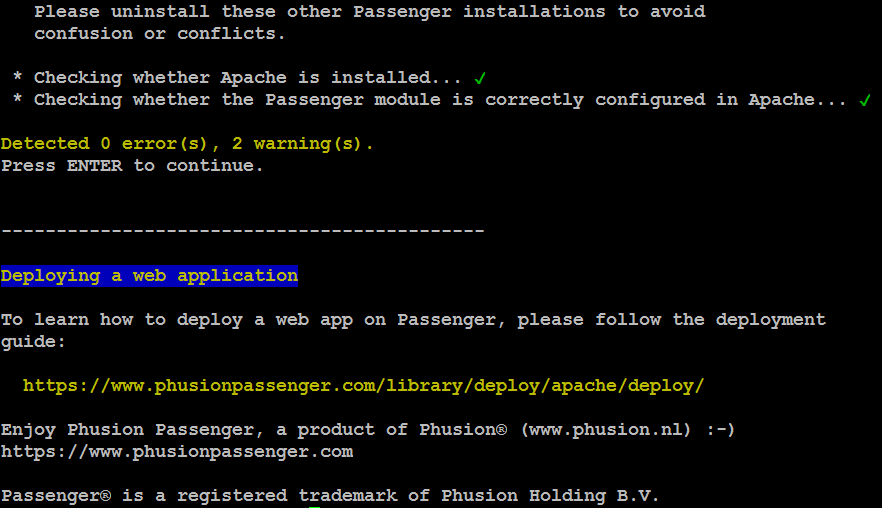
Therefore, open another ssh session as root user and perform following configurations.
Create an Apache module configuration file by using vim text editor.
vi /etc/httpd/conf.modules.d/00-passenger.confAdd following directives in this file.
LoadModule passenger_module /opt/redmineuser/.gem/ruby/gems/passenger-6.0.10/buildout/apache2/mod_passenger.so
   <IfModule mod_passenger.c>
     PassengerRoot /opt/redmineuser/.gem/ruby/gems/passenger-6.0.10
     PassengerDefaultRuby /usr/bin/ruby
   </IfModule>
Create an Apache configuration file by using vim text editor.
vi /etc/httpd/conf.d/redmine.confAdd following directives in this file.
Listen 3000
<IfModule mod_passenger.c>
  PassengerRoot /opt/redmineuser/.gem/ruby/gems/passenger-6.0.10
  PassengerDefaultRuby /usr/bin/ruby
</IfModule>
<VirtualHost *:3000>
    ServerName redmine-01.centlinux.com
    DocumentRoot "/opt/redmineuser/public"

    CustomLog logs/redmine_access.log combined
    ErrorLog logs/redmine_error_log
    LogLevel warn

    <Directory "/opt/redmineuser/public">
        Options Indexes ExecCGI FollowSymLinks
        Require all granted
        AllowOverride all
    </Directory>
</VirtualHost>
Verify the Apache configurations by executing following command.
httpd -tOutput:
Syntax OK
Continue and finish Passenger installation.
Restart Apache service to load changes.
systemctl restart httpd.servicePassenger installation with gems command does not provide a SELinux configuration.
Therefore, you have to disable SELinux on your Linux server.
setenforce 0
sed -i s/^SELINUX=.*$/SELINUX=disabled/ /etc/selinux/config
Open URL http://192.168.116.238:3000/login in a web browser again.
Frequently Asked Questions (FAQs)
1. What are the key features of Redmine?
Redmine offers issue tracking, project management, Gantt charts, time tracking, document sharing, and role-based access control. It supports multiple projects and integrates with version control systems like Git and SVN.
2. Is Redmine free to use?
Yes, Redmine is completely free and open-source. However, you may need hosting (self-hosted or cloud-based) and optional paid plugins for extra features.
3. What are the system requirements for Redmine?
Redmine runs on Ruby on Rails and requires:
- A web server (Apache, Nginx)
- A database (MySQL, PostgreSQL, SQLite)
- Ruby (version 2.7 or later)
- A supported application server (Puma, Passenger, etc.)
4. Can I customize Redmine?
Yes! Redmine supports plugins and themes to extend functionality. You can also modify workflows, roles, and permissions to fit your team’s needs.
5. Does Redmine support Agile/Scrum?
Redmine doesn’t have built-in Agile features, but plugins like Redmine Agile or Scrum can add Kanban boards, sprints, and burndown charts.
Final Thoughts
Installing Redmine on RHEL 8 can significantly enhance your project management capabilities, providing a powerful and customizable platform for tracking issues, managing tasks, and collaborating with your team. With its extensive feature set and flexibility, Redmine is an excellent choice for organizations looking to streamline their project workflows.
Need expert AWS and Linux system administration? From cloud architecture to server optimization, I provide reliable and efficient solutions tailored to your needs. Hire me today!
Let me help you get Redmine up and running seamlessly, so you can focus on managing your projects effectively.
Recommended Courses
If you’re serious about mastering web development, The Complete Ruby on Rails Developer Course by Rob Percival and Mashrur Hossain is one of the best investments you can make. This highly rated course takes you from beginner to professional developer, covering everything from Ruby fundamentals to building full-featured web applications with Rails.
Whether you’re aiming to land your first job in tech, upgrade your coding skills, or launch your own startup, this course provides the practical knowledge and real-world projects you need to succeed.
Disclaimer: This post contains affiliate links. If you purchase through these links, I may earn a small commission at no extra cost to you. This helps support my blog and allows me to keep creating useful content for readers like you.

Leave a Reply
You must be logged in to post a comment.