Learn how to remove old Linux kernels safely to free up disk space and keep your system organized. Follow our step-by-step guide to clean up unused kernels and maintain an efficient Linux environment. #centlinux #linux #linuxkernel
Table of Contents
What is a Linux Kernel?
The Linux kernel is a free and open-source, monolithic, modular, multitasking, Unix-like operating system kernel. It was conceived and created in 1991 by Linus Torvalds for his i386-based PC, and it was soon adopted as the kernel for the GNU operating system, which was created as a free replacement for UNIX. Since then, it has spawned a large number of operating system distributions, commonly also called Linux.
Linux is deployed on a wide variety of computing systems, such as embedded devices, mobile devices (including its use in the Android operating system), personal computers, servers, mainframes, and supercomputers.

Why Remove Old Linux Kernels?
Removing old Linux kernels can be beneficial but also comes with certain risks. Here are the pros and cons of removing old Linux kernels:
Pros
- Free Up Disk Space: Old kernels can occupy significant disk space. Removing them can free up space, especially important on systems with limited storage.
- Reduce Clutter: Keeping only the necessary kernels reduces system clutter, making it easier to manage and navigate your file system.
- Improve Boot Time: A shorter list of kernels in the GRUB menu can make boot selection quicker and more straightforward.
- Security: Ensures that only the most up-to-date kernels, which include the latest security patches, are in use, reducing the risk of vulnerabilities.
Cons
- Rollback Issues: Removing old kernels eliminates the possibility of rolling back to a previous kernel version if the current one has issues. This can be problematic if you encounter hardware or software compatibility problems with a new kernel.
- Potential for Mistakes: If not done carefully, you might accidentally remove the current or necessary kernels, leading to system boot issues.
- Complexity: The process might be complex for beginners, requiring careful attention to ensure that only unnecessary kernels are removed.
- Dependency Problems: There can be cases where certain drivers or modules are only compatible with specific kernel versions, and removing those kernels might lead to functionality issues.
Removing old Linux kernels is a good practice to maintain an organized and efficient system, but it should be done with caution. Always ensure that you have at least one stable kernel that you can fall back on in case of issues.
Problem Definition
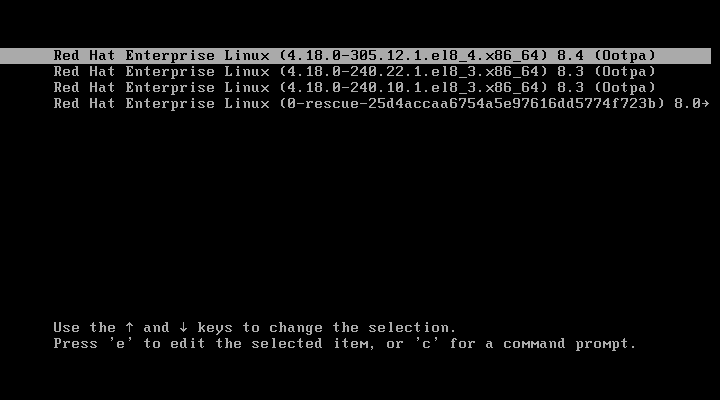
If you updated your Linux operating system, then you have notice that, after each upgrade of Linux Kernel the GRUB menu will add a new boot entry while keeping the previous entries intact. Have a look at below screenshot.

In default CentOS / RHEL 8 configurations, the Yum Package Manager installs maximum 3 versions of Linux Kernel. Therefore, the Kernel boot entries are limited to 3 only.
In this article, you will see how to remove old Linux kernels from your CentOS / RHEL 8 operating system.
Read Also: How to Safely Remove Old Kernels in Rocky Linux 9
Check installed Kernels in your Linux OS
To begin managing your installed Linux kernels, first, establish a secure connection with your Linux server as the root user. You can do this using an SSH client or directly from the system’s terminal if you have physical access.
Once logged in, it’s important to check the currently installed kernel versions before proceeding with any updates or removals. To achieve this, execute the following rpm command, which will list all installed kernel packages on your Linux operating system. This step ensures that you are aware of all available kernel versions and can decide which ones need to be retained or removed based on your requirements.
rpm -q kernelOutput:
kernel-4.18.0-240.10.1.el8_3.x86_64
kernel-4.18.0-240.22.1.el8_3.x86_64
kernel-4.18.0-305.12.1.el8_4.x86_64
Usually the latest Linux Kernel should be active on your operating system. Unless someone has explicitly set the default kernel to an older version.
You can confirm it by using following commands.
uname -r
grubby --default-kernel
Output:
4.18.0-305.12.1.el8_4.x86_64
/boot/vmlinuz-4.18.0-305.12.1.el8_4.x86_64
If the above command returns a kernel other than the latest one, then you have to set the default kernel for GRUB.
Set the Default Linux Kernel
To check the available Linux kernel versions currently installed on your system, you need to list the kernel-related files located in the /boot directory. This directory contains all the essential files required for the boot process, including different versions of the Linux kernel, initial RAM disk images, and bootloader configurations.
By listing the contents of the /boot directory, you can identify the available kernel versions and determine whether older ones should be removed to free up disk space. This step is particularly useful when managing multiple installed kernels and ensuring that your system is using the appropriate version for optimal performance and security.
ls /boot/vm*Output:
/boot/vmlinuz-0-rescue-25d4accaa6754a5e97616dd5774f723b
/boot/vmlinuz-4.18.0-240.10.1.el8_3.x86_64
/boot/vmlinuz-4.18.0-240.22.1.el8_3.x86_64
/boot/vmlinuz-4.18.0-305.12.1.el8_4.x86_64
To configure your system to boot with a specific kernel by default, you need to update the GRUB bootloader settings. This is particularly useful when multiple kernel versions are installed, and you want to ensure that your system always starts with a preferred version.
Execute the following command to set the default kernel for GRUB. This command modifies the GRUB configuration to prioritize a specific kernel during the boot process. After setting the default kernel, you should regenerate the GRUB configuration and reboot your system to apply the changes successfully.
grubby --set-default /boot/vmlinuz-4.18.0-305.12.1.el8_4.x86_64Output:
The default is /boot/loader/entries/25d4accaa6754a5e97616dd5774f723b-4.18.0-305.12.1.el8_4.x86_64.conf with index 0 and kernel /boot/vmlinuz-4.18.0-305.12.1.el8_4.x86_64
Removing Old Linux Kernels
By default, Linux kernels are always installed separately by the Yum Package Manager while keeping the old versions intact for fallback support.
This behavior is controlled by two Yum Package Manager directives.
installonlypkgs – Space separated list of packages who will never update by package manager.
installonly_limit – Maximum number of versions that can be installed simultaneously for any single package listed in the installonlypkgs directive.
Check the current value of installonly_limit directive
grep limit /etc/dnf/dnf.confOutput:
installonly_limit=3
To safely remove old versions of Linux kernels and free up disk space, you need to execute the appropriate command on the Linux Bash prompt. Removing outdated kernels helps in maintaining a clean and optimized system while preventing unnecessary clutter in the /boot directory.
Before proceeding with the removal, it is recommended to verify the currently installed and active kernel version to ensure that you do not accidentally delete the one currently in use.
Execute the following command on the Linux Bash prompt to remove the old versions of Linux kernels. Once the process is complete, update the GRUB configuration and reboot the system if necessary to apply the changes.
dnf -y remove --oldinstallonly --setopt installonly_limit=1 kernelOutput:
...
Removed:
  kernel-4.18.0-240.10.1.el8_3.x86_64
  kernel-4.18.0-240.22.1.el8_3.x86_64
  kernel-core-4.18.0-240.10.1.el8_3.x86_64
  kernel-core-4.18.0-240.22.1.el8_3.x86_64
  kernel-modules-4.18.0-240.10.1.el8_3.x86_64
  kernel-modules-4.18.0-240.22.1.el8_3.x86_64

Complete!
You may notice that, instead of altering the installonly_limit directive value in dnf.conf file, we are setting it at the runtime for current dnf command only.
Reboot your Linux operating system now.
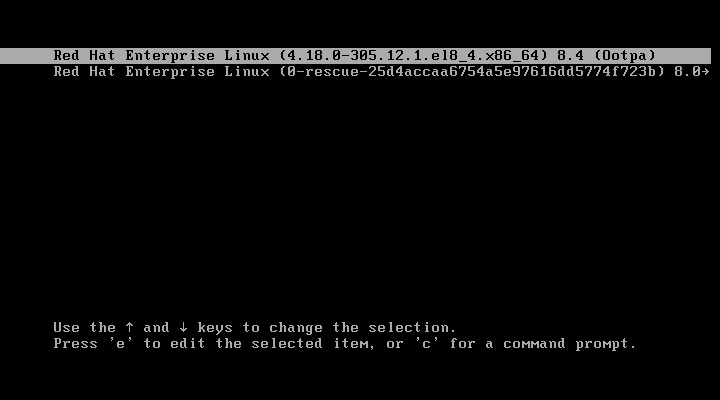
rebootCheck the GRUB boot menu, The old kernels entries has been removed.

Video Tutorial
Final Thoughts
Removing old Linux kernels is an essential maintenance task to free up disk space and keep your system organized. While Linux distributions manage kernel updates efficiently, keeping unnecessary old kernels can lead to clutter and wasted storage.
By listing installed kernels, identifying outdated ones, and safely removing them using package management tools, you can ensure your system remains clean and optimized. Always be cautious when deleting kernels and keep at least one previous version as a backup in case of issues. Regularly updating and maintaining your system will help prevent compatibility problems and improve overall performance.
Need a dependable Linux system administrator? I specialize in managing, optimizing, and securing Linux servers to keep your operations running flawlessly. Check out my services!
FAQs
Q1: Why should I remove old Linux kernels from my system?
Removing old kernels frees up disk space and reduces clutter in the boot menu, which can speed up system boot times and maintenance tasks.
Q2: Can removing the wrong kernel cause my Linux system to fail to boot?
Yes, deleting the active or current kernel can prevent the system from booting. Always keep at least one known good kernel and verify the current kernel before removal.
Q3: How do I check which Linux kernel version my system is currently using?
Run uname -r in the terminal; this displays the active kernel version that you should not remove.
Q4: Is it safe to automate old kernel removal with scripts or package managers?
It can be safe if you use trusted tools like package-cleanup or apt autoremove carefully, but always review what will be removed to avoid deleting needed kernels.
Q5: Why do some distributions keep multiple old kernels by default?
Distributions retain multiple kernels to provide fallback options in case a newer kernel causes system issues, ensuring reliability and easier recovery.
Recommended Courses
If you’re serious about leveling up your Linux skills, I highly recommend the Linux Mastery: Master the Linux Command Line in 11.5 Hours by Ziyad Yehia course. It’s a practical, beginner-friendly program that takes you from the basics to advanced command line usage with clear explanations and hands-on exercises. Whether you’re a student, sysadmin, or developer, this course will help you build the confidence to navigate Linux like a pro.
👉 Enroll now through my affiliate link and start mastering the Linux command line today!
Disclaimer: This post contains affiliate links. If you purchase through these links, I may earn a small commission at no extra cost to you, which helps support this blog.


Leave a Reply
Please log in to post a comment.