In this article, you will learn how to install Centreon on CentOS Linux 8 with step by step process and tips. #centlinux #linux #centreon
Table of Contents
What is Centreon?:
Originally called Oreon, Centreon is a solution for monitoring applications, systems and networks, based on the concepts of Nagios. The core of Centreon is Open Source, distributed under the GPL v2 license and free. Paid value-added add-ons are distributed by the publisher. Free and open source add-ons are developed by contributors on GitHub.
Centreon provides a simplified interface to make viewing the system status accessible to a greater number of users, including non-technicians, in particular using performance graphs. However, technicians still have access to the technical information of the scheduler. In 2005, the company Merethis (now Centreon) was founded and is responsible for uniting the community around this Open Source solution. (Source: Wikipedia)
Environment Specification:
We are using a minimal Red Hat Enterprise Linux 8 virtual machine with following specifications.
- CPU – 3.4 Ghz (2 cores)
- Memory – 2 GB
- Storage – 20 GB
- Operating System – Red Hat Enterprise Linux 8.5
- Hostname – centreon-01.centlinux.com
- IP Address – 192.168.116.243 /24
Update your Linux Server:
Connect with centreon-01.centlinux.com as root user by using a ssh client.
Build cache for installed yum repositories.
# dnf makecache
Updating Subscription Management repositories.
Red Hat Enterprise Linux 8 for x86_64 - BaseOS  2.7 kB/s | 4.1 kB     00:01
Red Hat CodeReady Linux Builder for RHEL 8 x86_ 4.1 kB/s | 4.5 kB     00:01
Red Hat Enterprise Linux 8 for x86_64 - AppStre 4.2 kB/s | 4.5 kB     00:01
Metadata cache created.
Update existing software packages in your Linux Server by using dnf command.
# dnf update -y
If the above command updates your Linux Kernel, then you should reboot your Linux server with new Kernel.
# reboot
After successful reboot, verify the versions of your Linux operating system and Kernel.
# cat /etc/redhat-release
Red Hat Enterprise Linux release 8.5 (Ootpa)

# uname -r
4.18.0-348.7.1.el8_5.x86_64
Install Centreon Prerequisites:
The Centreon unattended installation script is good enough for installing all necessary prerequisites.
This applies to CentOS Linux, Rocky Linux and AlmaLinux.
However, in case of Red Hat Enterprise Linux (RHEL) 8 you have to manually install EPEL (Extra Packages for Enterprise Linux) before executing Centreon installation script.
You can execute following dnf command to install EPEL on your Linux server.
# dnf install -y https://dl.fedoraproject.org/pub/epel/epel-release-latest-8.noarch.rpm
Install Centreon on CentOS Linux:
Download and execute Centreon installation script by executing following command at Linux Bash prompt.
# curl -L -s https://raw.githubusercontent.com/centreon/centreon/master/unattended.sh | sh
2022-01-14 09:47:23-05:00 - WARN - No provided operation : default value [install] will be used
2022-01-14 09:47:23-05:00 - WARN - No topology provided : default value [central] will be used
2022-01-14 09:47:23-05:00 - WARN - No version provided : default value [21.10] will be used
2022-01-14 09:47:23-05:00 - WARN - No repository provided : default value [stable] will be used
2022-01-14 09:47:23-05:00 - INFO - Start to execute operation [install] with following configuration parameters:
2022-01-14 09:47:23-05:00 - INFO -  topology   :        [central]
2022-01-14 09:47:23-05:00 - INFO -  version    :        [21.10]
2022-01-14 09:47:23-05:00 - INFO -  repository :        [stable]
2022-01-14 09:47:23-05:00 - WARN - It will start in [5] seconds. If you don't want to wait, press any key to continue or Ctrl-C to exit

2022-01-14 09:47:23-05:00 - INFO - Check if the system OS is supported and set the environment variables
2022-01-14 09:47:24-05:00 - INFO - Your running OS is redhat-release-8.5-0.8.el8.x86_64 (version: 8.5)
2022-01-14 09:47:24-05:00 - INFO - Setting specific part for v8 (8.5)
Repository 'codeready-builder-for-rhel-8-x86_64-rpms' is enabled for this system.
2022-01-14 09:48:30-05:00 - INFO - Remi repositories installation...

Installed:
  remi-release-8.5-2.el8.remi.noarch

Updating Subscription Management repositories.
Error: No matching repo to modify: powertools.
2022-01-14 10:01:22-05:00 - INFO - Installing PHP 8.0 and enable it
Importing GPG key 0x5F11735A:
 Userid     : "Remi's RPM repository <remi@remirepo.net>"
 Fingerprint: 6B38 FEA7 231F 87F5 2B9C A9D8 5550 9759 5F11 735A
 From       : /etc/pki/rpm-gpg/RPM-GPG-KEY-remi.el8
Importing GPG key 0x5F11735A:
 Userid     : "Remi's RPM repository <remi@remirepo.net>"
 Fingerprint: 6B38 FEA7 231F 87F5 2B9C A9D8 5550 9759 5F11 735A
 From       : /etc/pki/rpm-gpg/RPM-GPG-KEY-remi.el8
Importing GPG key 0x5F11735A:
 Userid     : "Remi's RPM repository <remi@remirepo.net>"
 Fingerprint: 6B38 FEA7 231F 87F5 2B9C A9D8 5550 9759 5F11 735A
 From       : /etc/pki/rpm-gpg/RPM-GPG-KEY-remi.el8

Installed:
  httpd-filesystem-2.4.37-43.module+el8.5.0+13064+c4b14997.noarch
  nginx-filesystem-1:1.14.1-9.module+el8.0.0+4108+af250afe.noarch
  oniguruma5php-6.9.7.1-1.el8.remi.x86_64
  php-cli-8.0.14-1.el8.remi.x86_64
  php-common-8.0.14-1.el8.remi.x86_64
  php-fpm-8.0.14-1.el8.remi.x86_64
  php-mbstring-8.0.14-1.el8.remi.x86_64
  php-xml-8.0.14-1.el8.remi.x86_64

2022-01-14 10:05:29-05:00 - INFO - Installing packages dnf-plugins-core epel-release
2022-01-14 10:05:38-05:00 - INFO - Updating package gnutls
2022-01-14 10:05:47-05:00 - INFO - Following Centreon repo will be used [centreon-stable*]
2022-01-14 10:05:47-05:00 - INFO - Systemd is running
2022-01-14 10:05:47-05:00 - INFO - Set runtime SELinux mode to [disabled]
2022-01-14 10:05:47-05:00 - WARN - Current SELinux mode is disabled. Nothing to do
2022-01-14 10:05:47-05:00 - INFO - Centreon official repositories installation...
...
...
...
2022-01-14 10:28:01-05:00 - INFO - Centreon SELinux rules are installed. Please consult the documentation https://docs.centreon.com/21.10/en/administration/secure-platform.html for more details.
2022-01-14 10:28:01-05:00 - INFO - Set runtime SELinux mode to [permissive]
2022-01-14 10:28:01-05:00 - INFO - Change SELinux config to mode [permissive]
2022-01-14 10:28:01-05:00 - WARN - Modifying /etc/selinux/config. You must reboot your machine.
2022-01-14 10:28:01-05:00 - INFO - Follow the steps described in Centreon documentation: https://docs.centreon.com/21.10/en/installation/web-and-post-installation.html
2022-01-14 10:28:01-05:00 - INFO - Centreon [central] successfully installed !

****** IMPORTANT ******
As you will need password for user MariaDB [root], random password are generated
Passwords are currently saved in [/etc/centreon/generated.tobesecured]
Random password generated for user [MariaDB user : root] is [Yjg1OTVlZjU0YmU0ZjQyM2IyZDA2YmM4]

Please save them securely and then delete this file!
The Centreon installation process is completely unattended and take a while to complete.
But the installation script configures SELinux, Linux Firewall, Systemd Services and all necessary file permissions and required settings.
Note down the MariaDB root user password and delete the password file as suggested by the Centreon installer.
# rm -f /etc/centreon/generated.tobesecured
Open URL http://centreon-01.centlinux.com in a web browser.

You are at the “Welcome to Centreon Setup” page, Click on “Next” button.

The web setup performs dependency checkup. Since, you are installing Centreon by using unattended installation script, hence all the dependencies already resolved by the installer.
Click on “Next”.

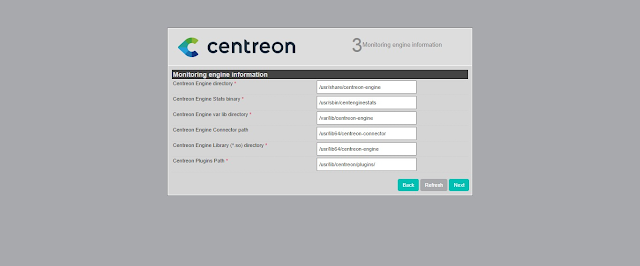
Set the Centreon monitoring engine paths or go with the default settings and Click on “Next”.

Set remaining Centreon monitoring engine paths related to Broker module or go with the default settings and Click on “Next”.

Provide Centreon admin user information. Don’t forget to set a strong password here.
Click on “Next”.

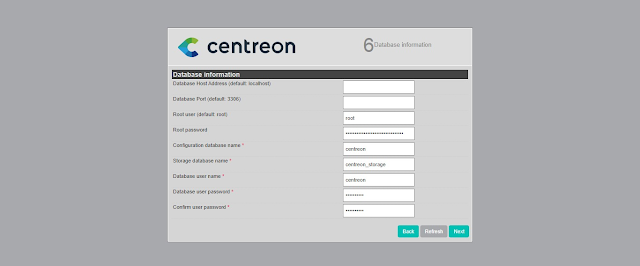
Provide the information about your MariaDB database.
The MariaDB database server is also installed by the Centreon unattended installation script.
And you have been provided the password at the end of Centreon installation.
Enter that password here in this page and click on “Next”.

Centreon monitoring server installation is in progress.
Let it complete and then click on “Next”.

Select your required Centreon Modules and Click on “Next”.

Centreon modules has been installed. Click on “Next” to continue.

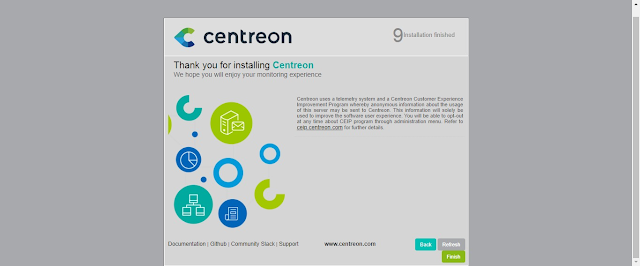
Finally you are the “Installation Finished” page. Click on Finish to end Centreon setup

You are automatically redirected to the Centreon monitoring server login page.
Login as admin user.

After successful login, you will reach at the Centreon montoring server web console.
Conclusion – Install Centreon on CentOS Linux 8:
In this article, you have learned how to install Centreon on CentOS Linux 8 or similar Linux distros.


