In this article, you will learn how to install Linux Dash on Rocky Linux 8 or other RPM based Linux distros. #centlinux #linux
Table of Contents
What is Linux Dash?:
A simple & low-overhead web dashboard for Linux systems. Linux Dash comes in well under 1MB of source code and only shows data when client browsers request it. Unlike server-side agent processes, Linux Dash does not gather or maintain historical data-sets, allowing its purpose and footprint to remain focused to a smaller surface area.
The server-side implementation of Linux Dash is available in several languages (Node.js, Python, Go, & PHP). The reason this approach is taken is because majority of the complexity is in the layer which fetches & processes the system data. This allows the server-side implementations to remain wrappers which serve as simple router applications for funneling requests from the client to the Data Pipeline.
Linux Dash Features:
- Small in Size – Under 400KB on disk (with .git removed)!
- Simple to Use – A minimalist, beautiful dashboard
- Easy to Install – Drop-in installation
- Versatile – Choose your stack from Node.js, Go, Python, PHP
Environment Specification:
We are using a minimal Rocky Linux 8 virtual machine with following specifications.
- CPU – 3.4 Ghz (2 cores)
- Memory – 2 GB
- Storage – 20 GB
- Operating System – Rocky Linux 8.6 (Green Obsidian)
- Hostname – grafana-01.centlinux-com.preview-domain.com
- IP Address – 192.168.116.128 /24
Updating Linux Operating System:
By using a ssh client, connect with linux-dash-01.centlinux-com.preview-domain.com as root user.
Build your yum cache by executing dnf command.
# dnf makecache
Rocky Linux 8 - AppStream                       1.6 kB/s | 4.8 kB     00:02
Rocky Linux 8 - BaseOS                          1.6 kB/s | 4.3 kB     00:02
Rocky Linux 8 - Extras                          1.4 kB/s | 3.5 kB     00:02
Metadata cache created.
Execute following command at Linux bash to update your Linux operating system.
# dnf update -y
If your Linux Kernel is updated due to above command, then you should reboot your Linux operating system before installing Linux Dash software.
# reboot
After reboot, verify the Linux Operating System and Kernel versions as follows.
# cat /etc/rocky-release
Rocky Linux release 8.6 (Green Obsidian)

# uname -r
4.18.0-372.13.1.el8_6.x86_64
Install Linux Dash Prerequisites:
Linux Dash is a versatile software application that can simultaneously run on Node.js, Go, Python and PHP.
Here, we are deploying Linux Dash on PHP based web server.
For this purpose, we are using Apache Web server and the PHP.
You may also need git command to fetch the Linux Dash Software from GitHub.
We are installing all above prerequisites in following single dnf command.
# dnf install -y git httpd php
Enable and start PHP and Apache services.
# systemctl enable --now php-fpm httpd
Created symlink /etc/systemd/system/multi-user.target.wants/php-fpm.service → /usr/lib/systemd/system/php-fpm.service.
Created symlink /etc/systemd/system/multi-user.target.wants/httpd.service → /usr/lib/systemd/system/httpd.service.
Configure Linux Firewall:
Allow the HTTP service in Linux Firewall to make it accessible across the network.
# firewall-cmd --permanent --add-service=http
success
# firewall-cmd --reload
success
Configure SELinux for Linux Dash:
Linux Dash software is not compatible with SELinux, therefore, for it’s proper function, you have to permanently disable the SELinux.
Temporary put SELinux in permissive mode by executing following command at Linux Bash.
# setenforce 0
Now, edit the SELinux configuration file by using vim text editor.
# vi /etc/selinux/config
Find and set following directive to permanently disable SELinux.
SELINUX=disabled
Install Linux Dash Software:
By using git command, make a clone of Linux Dash software from GitHub to Apache Document Root (/var/www/html) directory.
# cd /var/www/html/
# git clone --depth 1 https://github.com/afaqurk/linux-dash.git
Cloning into 'linux-dash'...
remote: Enumerating objects: 82, done.
remote: Counting objects: 100% (82/82), done.
remote: Compressing objects: 100% (74/74), done.
remote: Total 82 (delta 6), reused 31 (delta 3), pack-reused 0
Receiving objects: 100% (82/82), 109.34 KiB | 874.00 KiB/s, done.
Resolving deltas: 100% (6/6), done.
Configure HTTP Basic Authentication:
Linux Dash is a very simple software and does not provide any user based authentication.
No Problem! You can leverage the HTTP basic authentication to configure user based security for your Web Application.
Create a user admin by executing following htpasswd command.
# htpasswd -c /etc/htpasswd.conf admin
New password:
Re-type new password:
Adding password for user admin
Now configure Apache web server to use your password file for authentication.
# vi /etc/httpd/conf/httpd.conf
Add following directives in this file.
<Directory "/var/www/html/linux-dash/app">
    AllowOverride none
    AuthType Basic
    AuthName "Restricted Content"
    AuthUserFile /etc/htpasswd.conf
    Require valid-user
</Directory>
Reload Apache service to apply changes.
# systemctl reload httpd
Access your Linux Dashboard:
Open URL http://linux-dash-01.centlinux-com.preview-domain.com/linux-dash/app/ in a web browser.
You have to login as the admin user, thanks to the HTTP Basic Authentication.
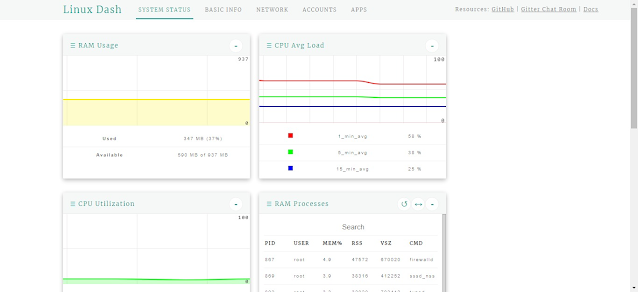
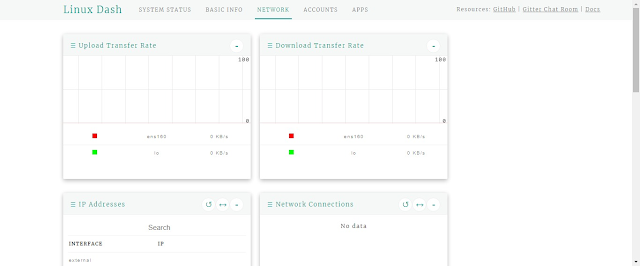
After successful Login you may reach at your Dashboard application. Some of the screenshots of this software are:


The software is showing many aspects of your Linux operating system.
If you are facing difficulty in understanding the above commands or your are not much familiar with the Linux CLI, then we highly recommend that you should read The Linux Command Line, 2nd Edition (PAID LINK) by William Shotts (Author) or enroll in a Linux online training such as Linux Command Line for Beginners.
Conclusion:
In this article, your have learned how to install Linux Dash on Rocky Linux 8 or other RPM based Linux distros.


